4 November 2011

Ladders

We wanted the possibility of having more than one type of ladder in our game (for example a ladder and a drain pipe), but with the current tools available, only one type of ladder could exist.

To create a second ladder, I knew I needed to extend the standard ladder volume which I managed to do fairly easily. This allowed me to place my custom ladder volume in the world and it could be used just like the other ladder.

My custom ladder variables


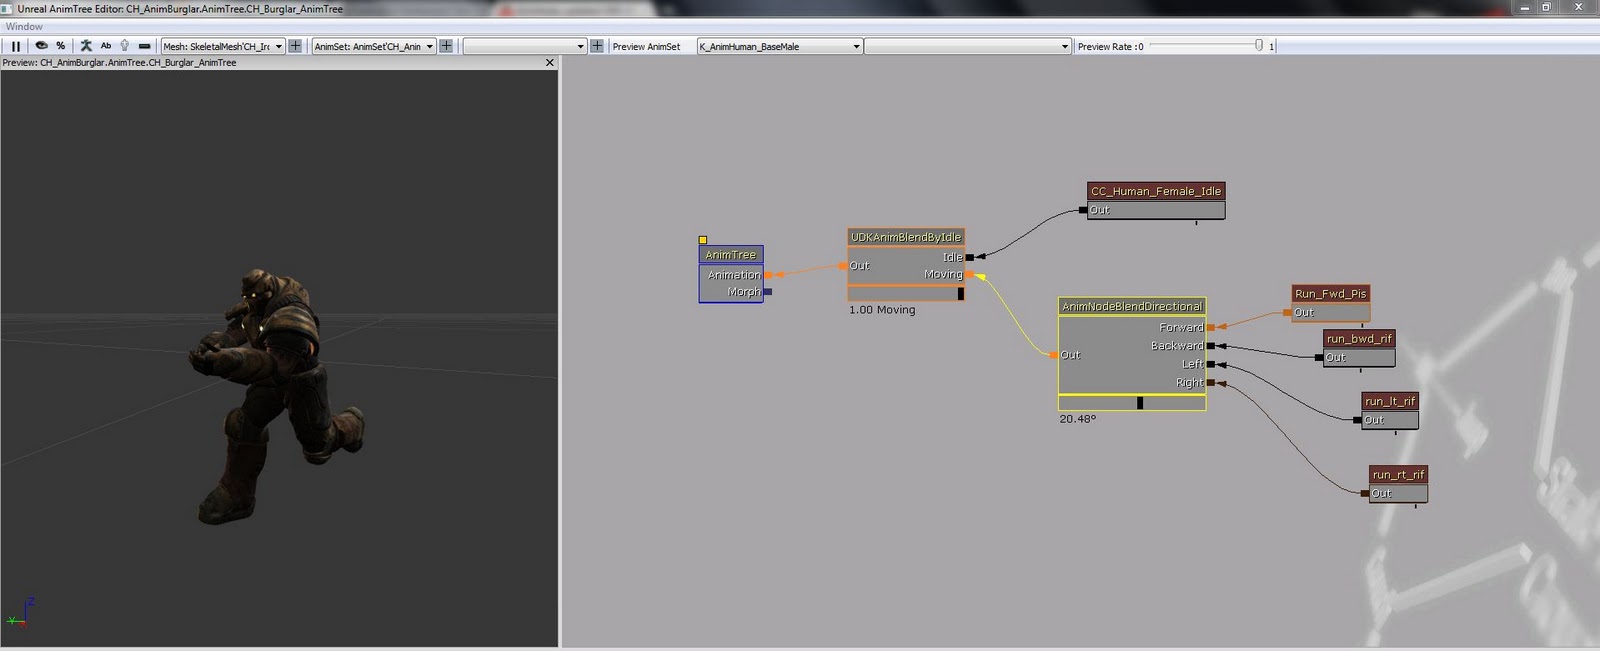
Looking at the anim tree node that controlled which animations were played when in different physics volumes I saw that each volume was calling a 'PHYS_XXX' command. With this is mind I tried to create a new PHYS_ command but had no luck trying to locate the class where they were defined. I did manage to add a new variable to the anim tree node but with no custom PHYS_ variable it was a useless connection.

I enquired about this on the epic forums and got a reply which stated


slowJusco -
"The PHYS_<xxx> stuff is handled natively.Better off extending ladder volumes and adding a laddertype, then checking for that via a custom animation node."


I had already extended the ladder volume so I just needed to create a custom node which handled what type of ladder we were in.


Once this was done I realised there was another problem with my anim tree. I was using the 'animblendbydirectional' as I believed that the game would read the input command and play the animation accordingly but because the ladder volume forced the player to face forwards, any input I made other than 'idle' was calling the forwards animation. Again, I took to the forums to ask for advice and suggested I needed a node that could tell if the player was moving up or down in world space and play an animation accordingly (only when in my custom ladder volume, we don't want to break jumping and falling) and again slowJusco had the perfect answer.

The new node just had to measure the players velocity on the Z axis. If it was larger than 0 then it would play an up animation and if it was lower than 0 it would play a down animation.

My custom anim tree - handles ladder types and player Z axis movement
With that sorted we can now add ladder climbing animations (something the UDK could not do before) and will help us hugely with our level creation as we can have two different types of ladder. I also now know how to create custom anim tree nodes and how to check for variables.

Here is a video showing the movement progress so far (animations are all temporary)

Concept Art 3- Map and Environments


Creating of a map allows to plan potential game scenarios.

It also helps in visualising environmental concepts before final stage which is modeling.This is how it works: Concept artist prepares 3d visualisation of a room based on an outline selection on the map. Purposes of it are many:

Concept artist:

1. suggests colours, light and atmosphere of the level.

2. creates references for 3d artists.

3. helps to understand the sense of space, therefore again, along with the map provides reference for game designer responsible for the gameplay.


3 November 2011

Adding some useful functionality to our game.

Our aim is to create all of the mechanics needed now, so we have a fully working game engine for us to drop our content into at a later date.

I first set up a basic 3rd person camera by modifying the position of the 'behindview' camera and then forcing this view.

This will be revisited later to create a proper custom camera type but for now gives us a better view of the world.


Walk, Run and Sneak
Movement in our game will be split into three states. Sneaking, Walking and Running with walking being the default state.

To achieve this I needed to code a custom command into my Pawn to allow sprinting and then bind it to the keyboard.

We will be using the standard crouching functionality as our sneaking as it already has a separate animation state within the anim tree and offers control over the speed of movement. Why over complicate something that already exists?!

I have been following the Eat3D 'Introduction to Unrealscript' DVD and have learnt quite a bit about adding functionality into custom classes but I didn't know how to create bindable commands such as a change in groundspeed value.

I found a tutorial on the UDK Central wiki that explained how to do exactly what I wanted and also how to bind the commands.

Once this was done, I added a UDKBlendBySpeed node into the anim tree so I could tell it to differentiate between walking and running to call different animations.

I also disabled the ability to double jump and the ability to double tap a direction to dodge as these didn't exist in our game.

So that out of the way I decided to change some of the key bindings to match our control layout.
Shift - Sprint
Left ctrl - Sneak
Space - Jump (no double jump)
F - (No longer calls 'feigndeath' as our gameplay relies on the use of this command for other things)

I will post an update tomorrow about ladder functionality

Custom User Interface

The Custom User Interface will be the first thing players would see after the Unreal logo animation, and our own Purple House logo animation. From here, you must be able to play the game, including choosing a map, changing options, and being able to exit the game.

Another important hole the user interface must fill is to serve as a scene to illustrate the feel of the game, and this is what I design for. Talking in our group, we already had some basic ideas for what the user interface should look like. One idea was to base it off of 1950's postcards, particularly the one to the right:

To being this, very, very rough pencil drawings were made to basically represent some ideas, including the postcard idea among them.
Included with these initial concepts is a Word Document that explains what each scene would have present in it, and how each one would be presented. It then goes on top talk about what we thought worked and didn't work after group discussions on the matter. Eventually we came down to either using the 2nd design along, or the 3rd. The third best represented what we wanted for a "1950's postcard" look, an thus was developed further digitally in Photoshop, while still keeping it rough. 
These images are some variations of what we got. The top left (1) image shows the original idea in digital form. The Word Document included with these concepts in the project folders explains what worked and didn't work about it, and using this information I created three further alternatives.

Later we decided that the 1950's postcard look would not be used as a user interface, but rather used as a loading screen for each level of the game. The other design that got attention as a user interface was design 2 on the initial designs. This would require a 3D scene to be made up for it to work as intended, but we felt it would work the best overall. Further development of this is still under-way, but for now we are focusing more on mechanics with this as a side project.


31 October 2011

An early look at custom animation trees

To get our game to look and feel correct, we need to create custom animations for our characters. We also don't want to be constrained to the default UDK skeleton for our characters as this would mean that they couldn't look the way we want them to.

We have a fair understanding of how to import custom animations and how to make an animation set but the section I knew I needed to learn how to do was a custom animation tree which would allow us to use our own skeleton and animations.

I studied the 'AT_CH_Human' animation tree and played around with the sliders until I was happy that I understood how the node system worked.

I then went on to create a custom animation tree using a default skeletal mesh and default animations just to prove if my understanding was correct.

My custom anim tree with an idle animation and four movement animations

This now gives me a good understanding of how to plug in our own custom animations once we get to that stage, and is a major worry dealt with.

30 October 2011

Concept Art 2- Gadgets

Every "burglar" character in the game will have an option to purchase certain tools that allow him to distract or slow down his opponent. These traps or gadgets as we call them, have to be easy to carry, to set up and have mid range effectiveness providing the time to escape. We also want them to have certain style ssociated with the character who brought it to the game and probably uses them the most. This is first example of Babushka dools. Gadget carried by russian businessman- burglar. These egg shape dolls can be equiped with both gas or oil. They also have time- release trigger.


Latest design of our gadget concept boards provides schematics, character that brings the gadget to the game and visualisaton of the artifact in action, presenting its expected effectiveness. We also wanted those boards to relate to 1950's style.

This is The Knockout Pipe carried by English gentleman (Name yet uncertain) it works as perfectly normal pipe. This way it may be taken anywhere ( yep :) even to the pub because it is the 50's) without any suspicions from the security guards. However, after tuning one of the decorative elements, two glass containers inside the pipe release certain substances that after mixing with each other and fire, create thick, impossible to cross ( for some time) smoke.